
Table of Contents
1. Objectif #
Ce tutoriel décrit la procédure pour flasher la mémoire eMMC du Compute Module 5 (CM5) en le faisant apparaître comme un disque amovible sur votre ordinateur via l’utilitaire rpiboot.
2. Matériel requis et Connexions #

Figure 1 : Schéma général des connexions pour le flashage.
| Élément | Spécification |
|---|---|
| Câble USB-C | Doit supporter le transfert de données (Data). |
| Alimentation | Bloc secteur stable (évitez les ports USB PC pour alimenter la carte). |
| Logiciel Flash | Raspberry Pi Imager |
⚠️ Attention : Un câble USB de mauvaise qualité ou « charge uniquement » est la cause de 80% des échecs de détection.
3. Configuration des Switches #
Localisez le switch de boot sur votre carte porteuse (Carrier Board) et réglez-le avant la mise sous tension :
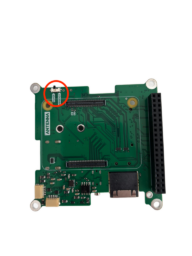
Figure 2 : Emplacement et positions du switch de boot.
| Position Switch | Mode | Description |
|---|---|---|
| nRPIBOOT | FLASH | Le CM5 attend une initialisation USB (Bootloader). |
| runOS | NORMAL | Le CM5 démarre sur le système installé en eMMC. |
4. Installation de rpiboot #
Linux (Debian/Ubuntu/Raspberry Pi OS) #
Terminal
sudo apt update
sudo apt install git libusb-1.0-0-dev build-essential
git clone --depth=1 https://github.com/raspberrypi/usbboot
cd usbboot && make
sudo ./rpiboot
Windows #
Téléchargez et installez l’exécutable : rpiboot_setup.exe. Les pilotes seront installés automatiquement.
5. Procédure de Flash #

Figure 3 : Exécution de rpiboot et détection du module.
- Basculez le switch sur nRPIBOOT (voir Figure 2).
- Reliez le port USB-C du CM5 à votre ordinateur.
- Branchez l’alimentation du CM5.
- Lancez
rpiboot(une fenêtre noire s’ouvre et se ferme une fois terminé, comme Figure 3). -
Ouvrez Raspberry Pi Imager :

Figure 4 : Configuration de Raspberry Pi Imager.
- Modèle : Raspberry Pi 5
- OS : Choisissez votre image (ex: Pi OS 64-bit)
- Stockage : Sélectionnez « RPi-MSD-0001 » (votre eMMC, voir Figure 4)
- Cliquez sur ÉCRIRE.
💡 Note : Si le disque n’apparaît pas après
rpiboot, essayez de débrancher/rebrancher le câble USB-C.
6. Finalisation #
- Une fois le flash terminé, débranchez l’alimentation.
- Important : Repassez le switch sur runOS.
- Débranchez le câble USB-C (optionnel).
- Rebranchez l’alimentation : le système démarre !
7. Dépannage rapide #
| Symptôme | Solution |
|---|---|
Waiting for BCM2712... infini |
Vérifiez le switch nRPIBOOT et le câble USB. |
| Erreur d’écriture dans Imager | Alimentation insuffisante du CM5 ou eMMC verrouillée. |
| Écran noir au reboot | Vérifiez que vous avez remis le switch sur runOS. |


